SuiteCRM Reporting Deep Dive: Exploring SuiteCRM Reports in Depth
Level up your CRM reporting skills and learn how to use them effectively in this SuiteCRM Reports – Deep Dive.
Welcome to SuiteCRM Reports – Deep Dive!
Today, we’ll dive into the world of SuiteCRM Reports and discover how to make the most of groups, joins, and filters within a single, comprehensive report – it will be a game-changer!
Now, assuming your SuiteCRM system is up and running, you might find it challenging to pinpoint the right data or prioritize tasks for the next two to three months. No worries! To address this, let’s focus on opportunities nearing closure or, in the worst case, those marked as “close lost” in your SuiteCRM system.
Take a look at this video on SuiteCRM Reports – Deep Dive, where I’ll take you on a journey to explore the more advanced features of SuiteCRM Reporting.
Get ready to learn new techniques, uncover hidden insights, and create powerful reports that will help drive success in your business.
I hope you’re as excited as I am to learn how to make the most of SuiteCRM reports! Stay tuned for the next steps.
Overview
Overview of SuiteCRM Report Fields
Let’s get started on identifying the most interesting opportunities for our sales team to focus on over the next three months.
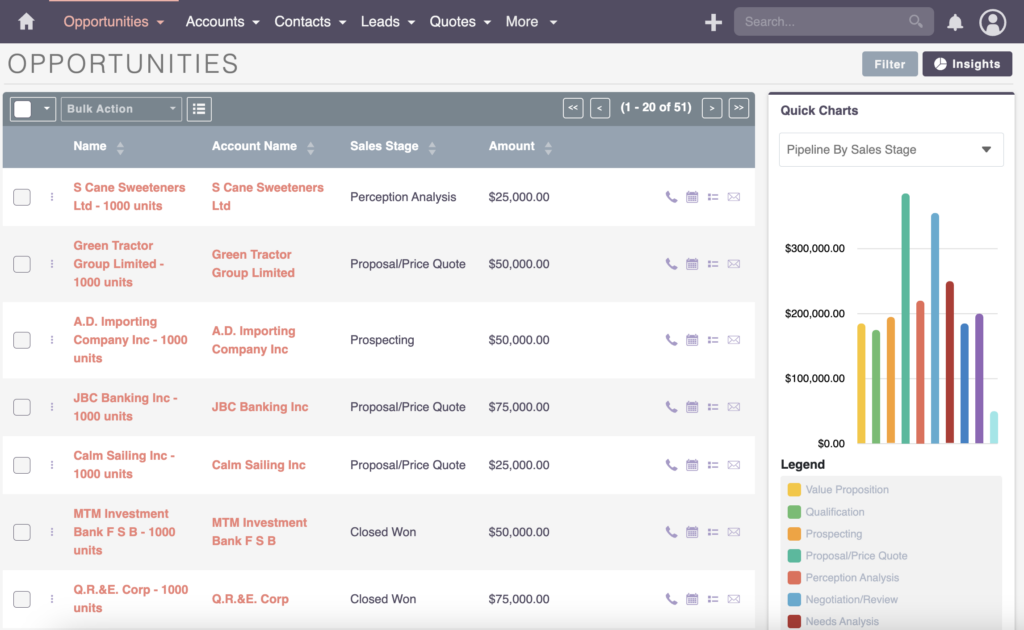
In this new CRM system, I’ve not only successfully brought in demo data but also tossed in some extra records for good measure. Now, the goal is to pinpoint intriguing opportunities for the sales team to focus on, specifically within the next three months.
In one of my projects, during sales team meetings, it’s important to have a comprehensive report that shows what’s happening, why we’re focusing on certain opportunities, and the likelihood of closure within the next three months.
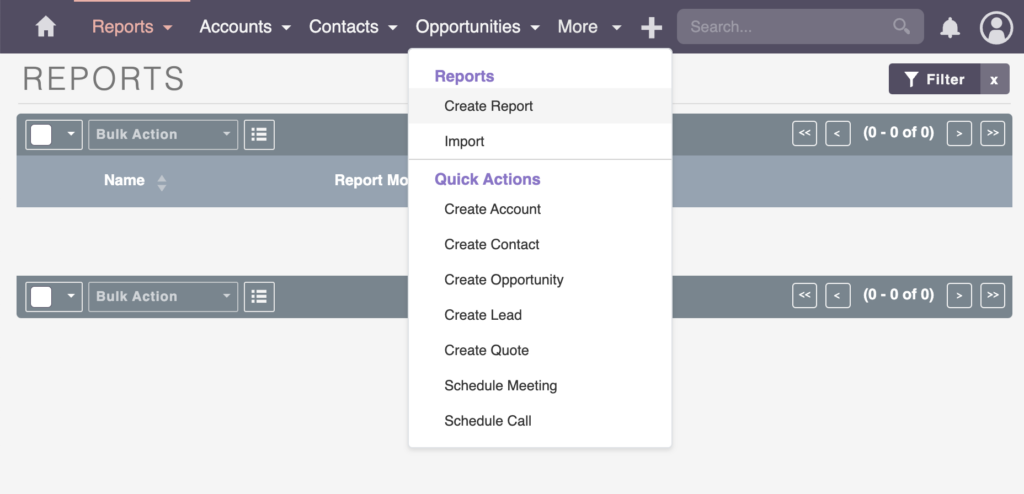
First things first, let’s open the Reports module in a separate tab so we can easily switch between it and the Opportunities module. Now, let’s create a new report and give it a title that reflects our goal.
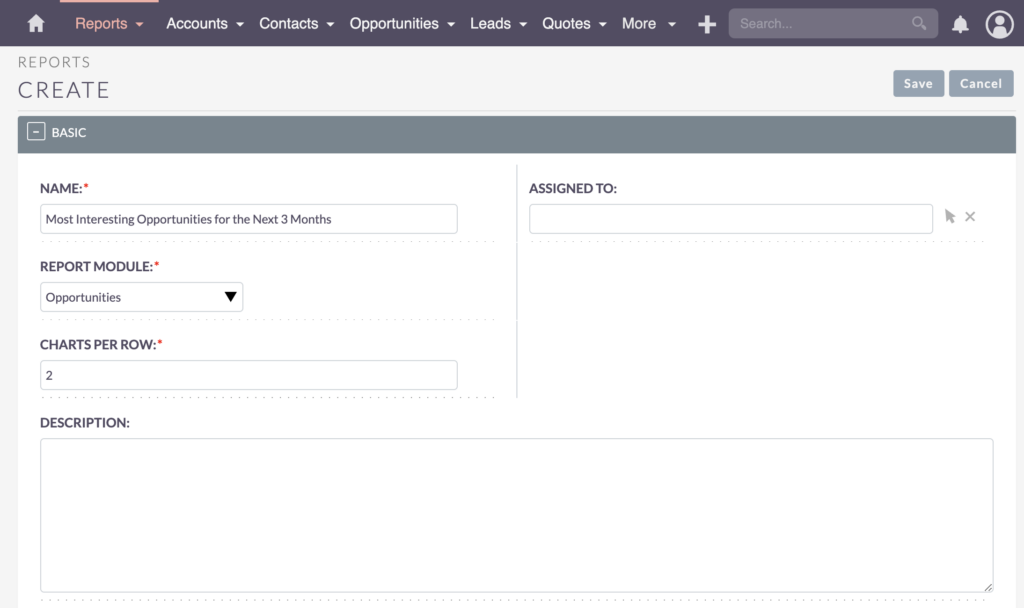
- Name: “Most Interesting Opportunities for the Next 3 Months”
- Report Module: Opportunities
- Charts per row: 2
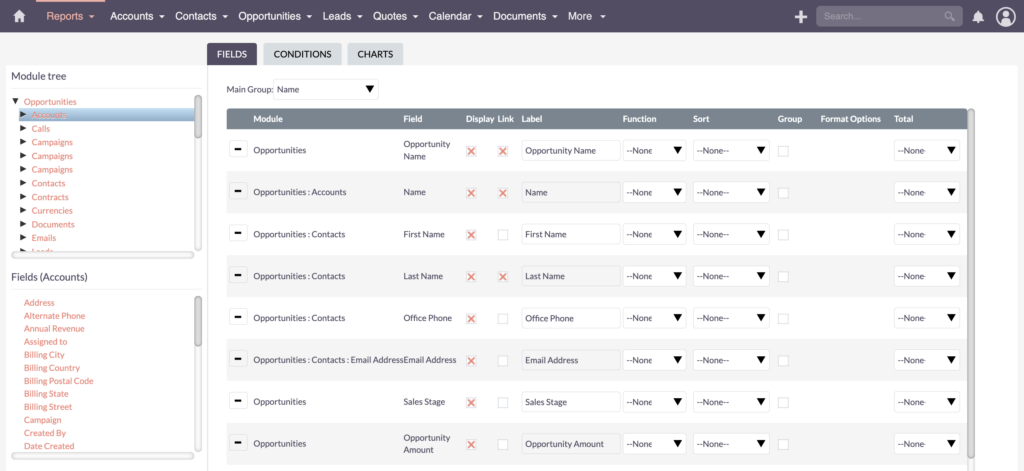
Move down to the Fields tab, and there you’ll find a Module Tree. Click on Opportunities and dive in by picking out fields like Opportunity Name, Opportunity Amount, and Expected Close Date.
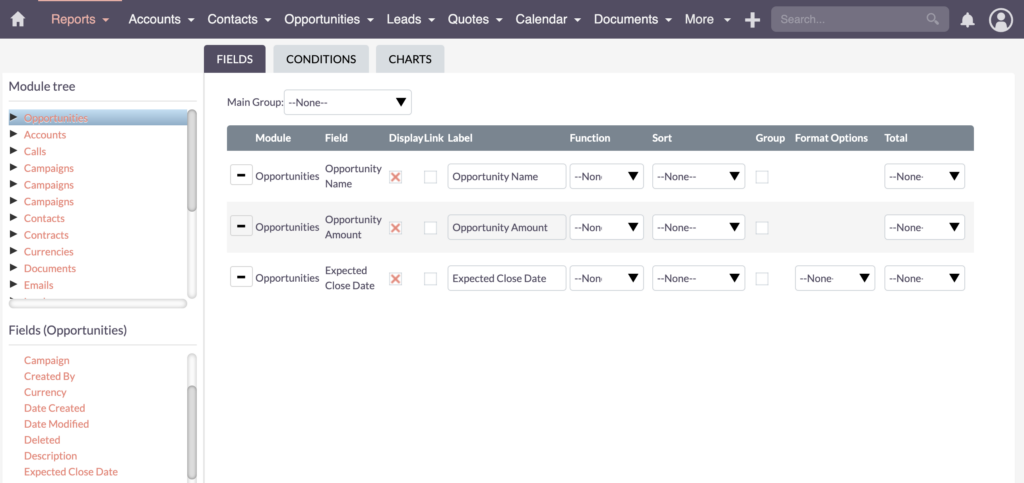
If you need a bit more guidance, feel free to check out my video on the SuiteCRM Report Basics.
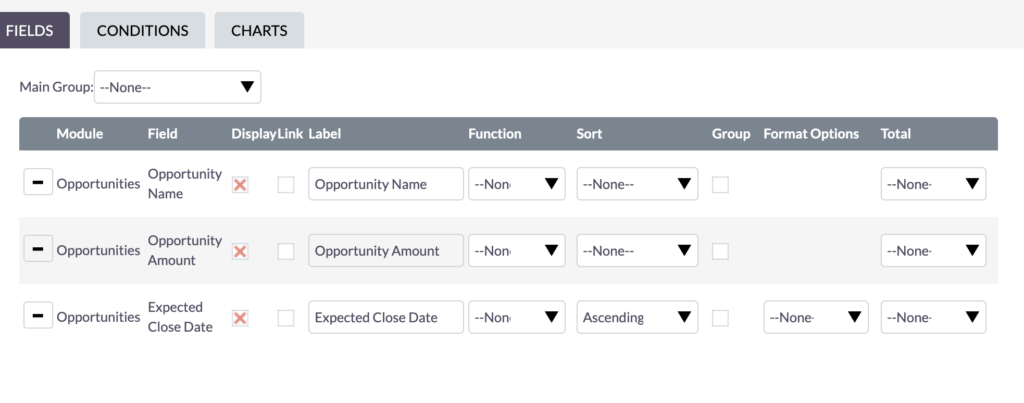
Now, let’s tidy things up. Sort these important columns in ascending order based on the Expected Close Date. This will make sure that the closest opportunities to close appear at the top of your report.
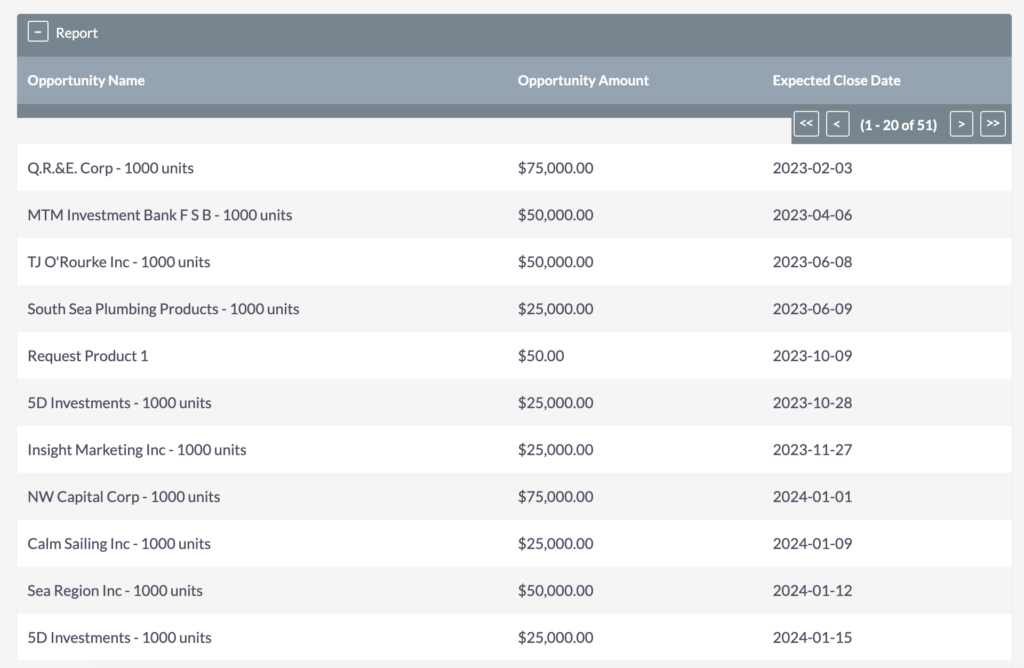
Save your progress to see the initial results. Now, you might notice that your report is showing records from the past. No worries, we can fix that! I’ll show you how to filter out records from the past and anything too far into the future with a bit of magic called Conditions.
Filtering Conditions
Refining Reports with Filtering Conditions
Let’s fine-tune some conditions to help us get a better view of opportunities, specifically focusing on the Expected Close Date.

Set it twice – first to display records Greater Than or Equal To the current date and the second one to showcase records Less Than or Equal To the current date plus another 3 months into the future. This way, you can get a good look at the data and plan your next moves.
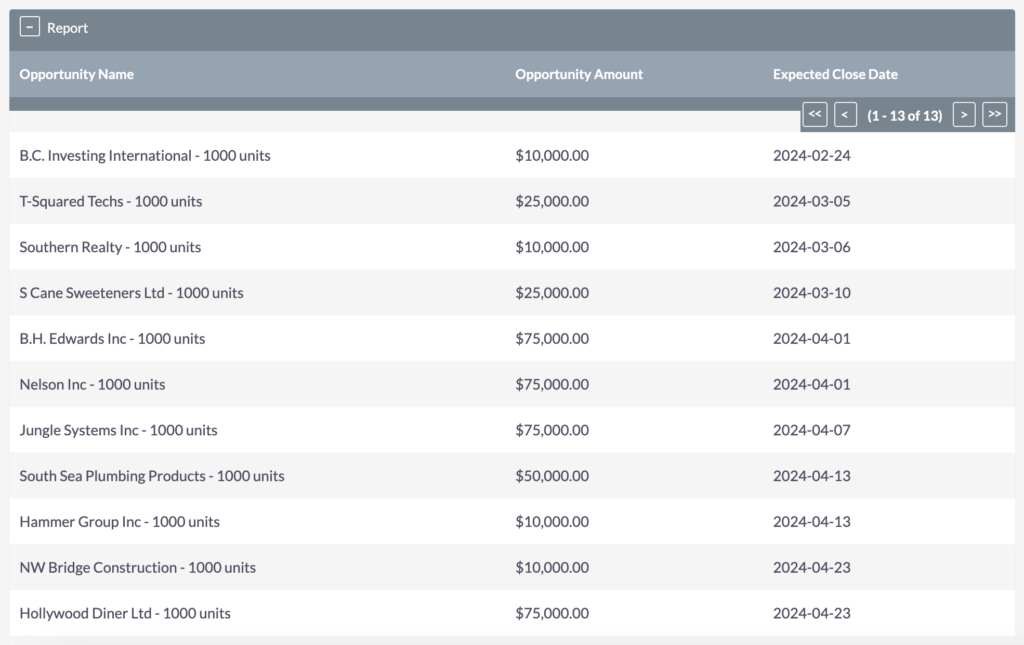
After you click on Save, take a look at how well the adjustments fit. This change will be effective for about 3 months’ worth of data, giving a significant timeframe to focus on as a team.
Linking Related Modules and Data into the Report
Now, let’s get into the nitty-gritty. I want to find out more about the companies and contacts linked to these opportunities.
To make things simple, I’m linking the Opportunity Name back to the record, creating a shortcut that takes us directly to the opportunity whenever we need more information.
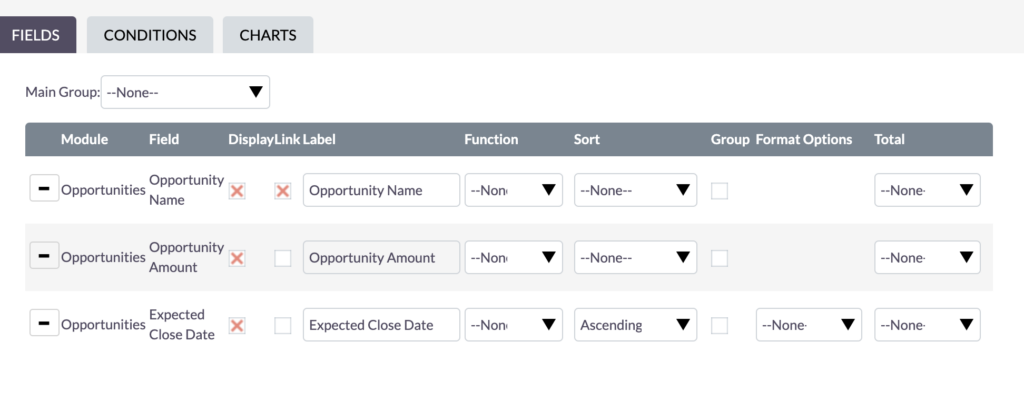
It’s all about keeping things easy and efficient, to focus on what truly matters – navigating the SuiteCRM system and understanding its vital components and the important stuff within it.
Understanding Nested Relationships Between Modules
Within SuiteCRM opportunities, there are nested relationships that are essential to explore. For instance, let’s open an Opportunity.
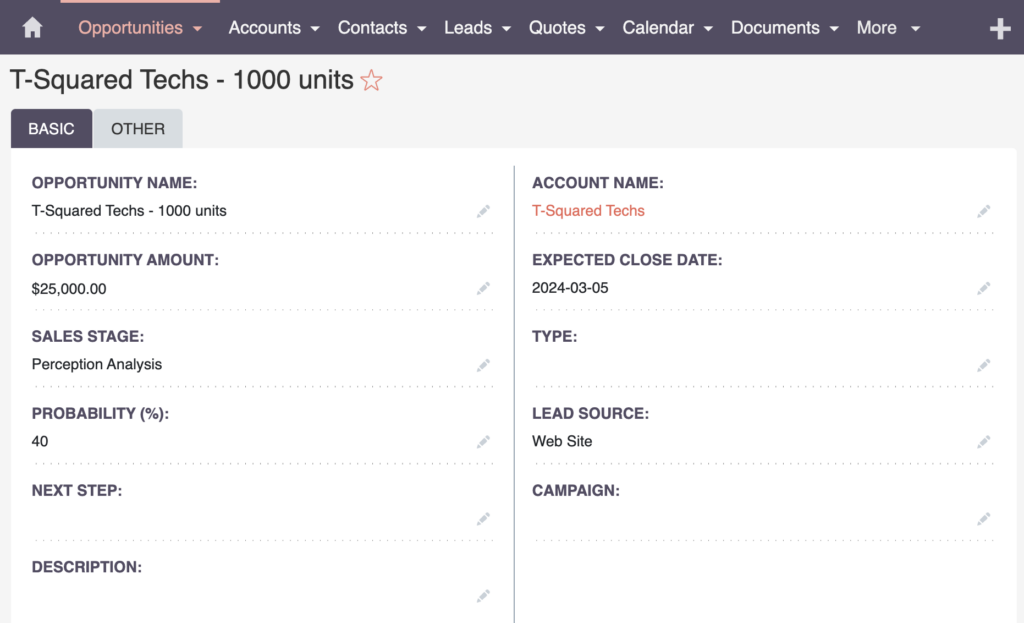
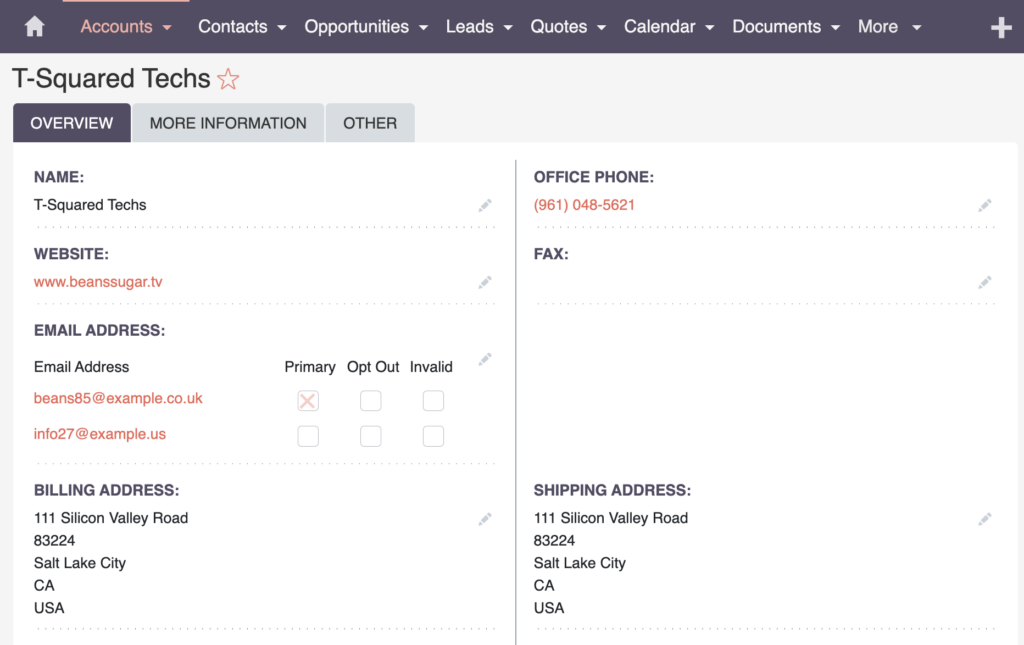
You’ll see its connection to the Account Name, indicating the company’s interest. There are also several contacts linked to this opportunity.
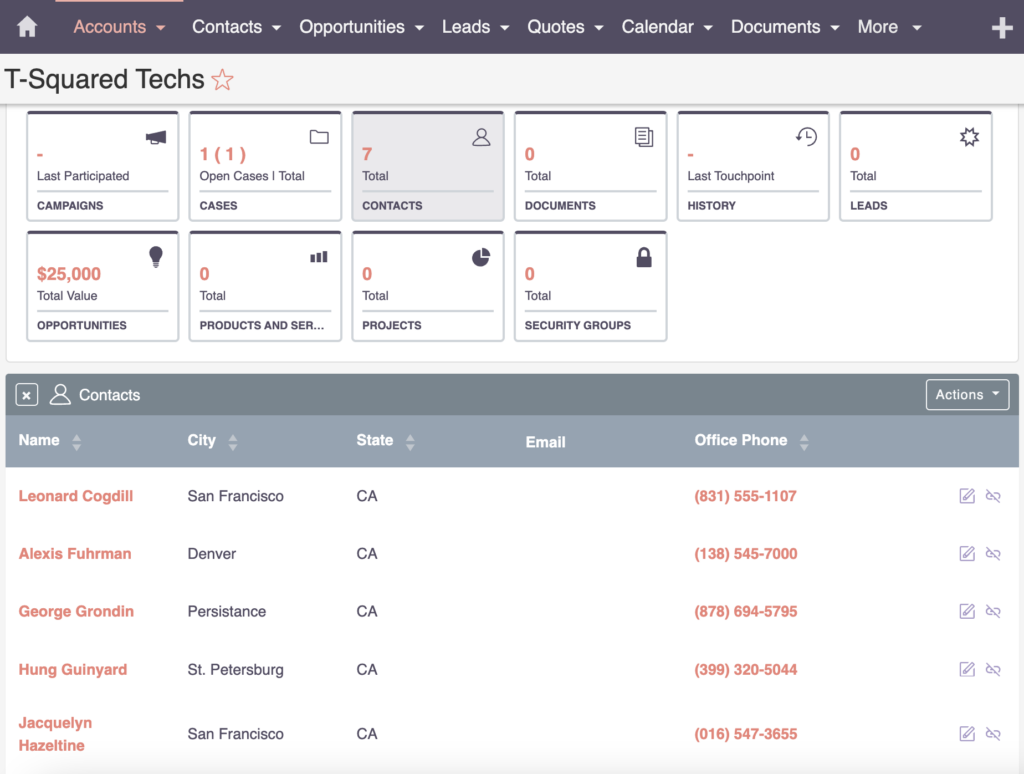
This information is valuable as it helps identify companies with multiple opportunities simultaneously. It facilitates communication within the team, allowing us to discuss who is on vacation or plan the next contact to reach out to.
Linking Accounts to Opportunities
To add this data to the report, go back to editing the report, scroll down the Module Tree, and click on the Opportunity toggle arrow, revealing related information within the opportunities. From here, click on Accounts, and then add the Account Name field. Link this one as well by ticking the link box.
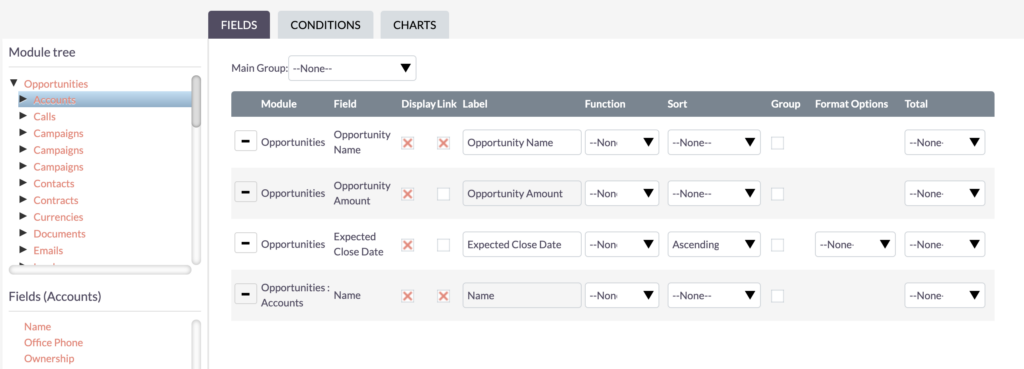
Understanding the module names is crucial, ensuring correct linkages between opportunities and accounts.

Ensure correct linkages between modules.
Take the time to understand the module names in SuiteCRM. It may seem like a small detail, but trust me—it’s worth the effort!
Bastian Hammer
Linking Contacts to Opportunities
Now, let’s include Contacts but focus on those linked specifically to this Opportunity. Contacts may vary in number compared to those associated with the account, emphasizing the need to retrieve contacts tailored to the opportunity itself.
Within Contacts, let’s display fields like First Name, Last Name, and Office Phone.
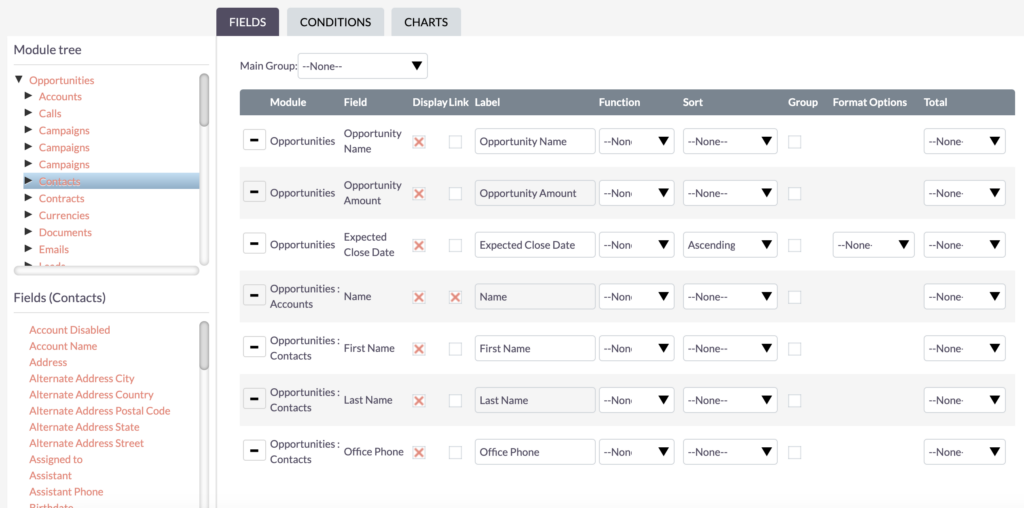
Don’t forget about the email address, tucked away as a hidden sub-module in the SuiteCRM system. To reveal it, from inside the Opportunity module tree, open Contacts, then open the Email Address. Add the field Email Address.
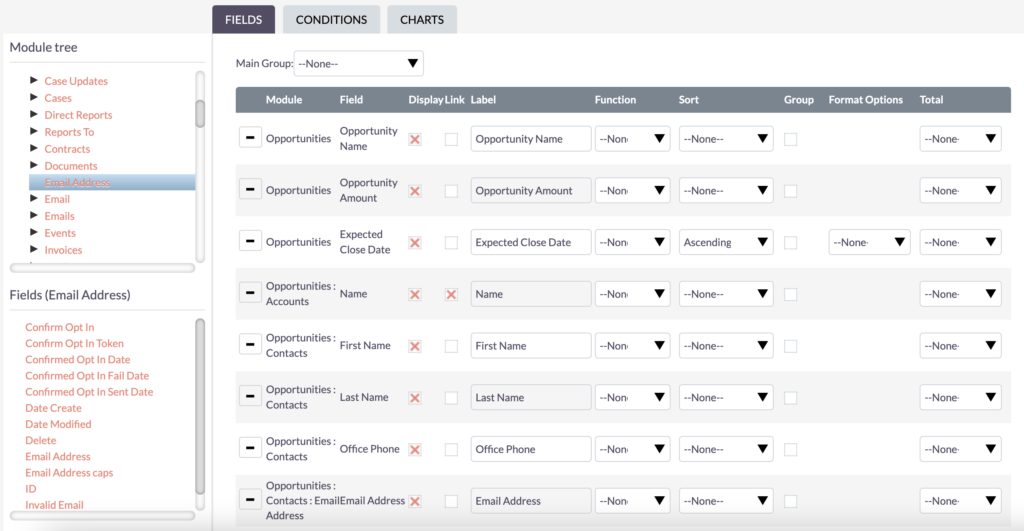
Now that I’ve added all the necessary fields for the report, I’ll link the Last Name to the contacts by ticking the link box.
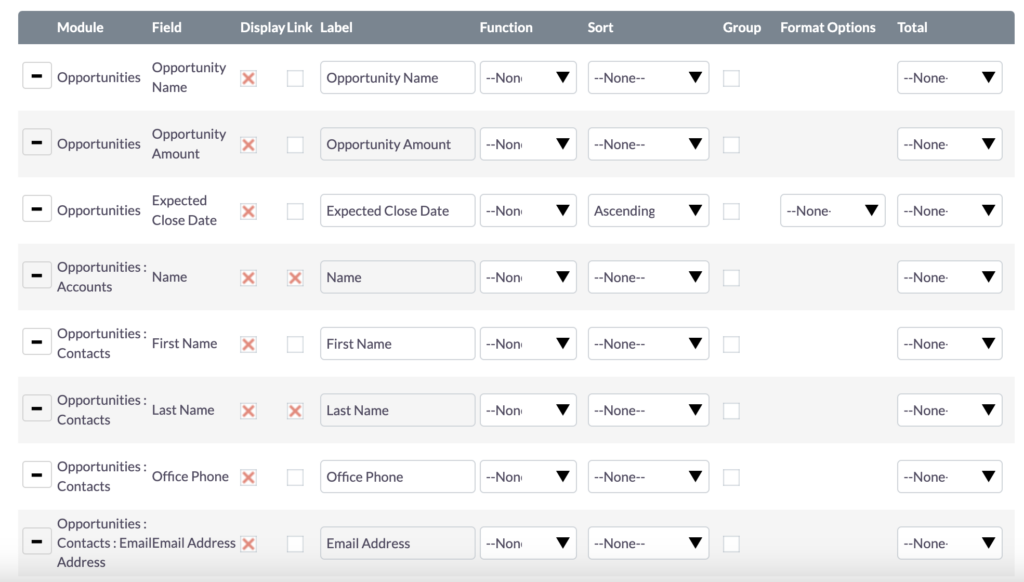
Organizing the Report
I’ll drag and drop to organize the fields for a more orderly appearance. By organizing this information systematically – opportunities, accounts, contacts – we create a comprehensive report.
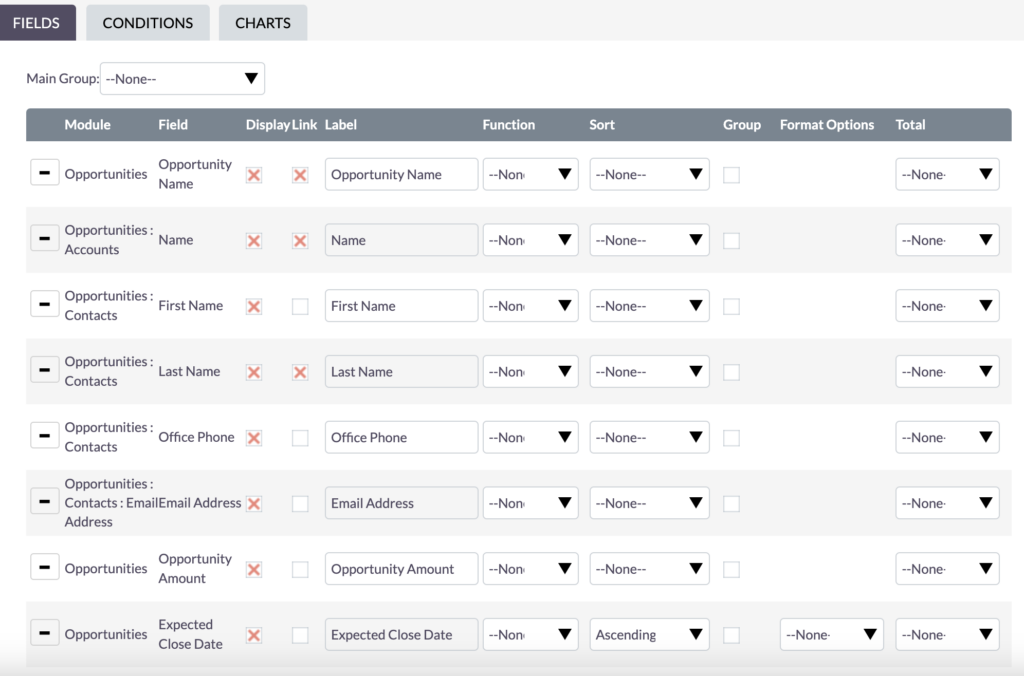
Finally, we include meta-information about the opportunity, such as the Amount and Expected Close Date, providing a holistic view. This ensures clarity and facilitates effective decision-making for your team.
So, my next move is to group per company, making it visibly clear whether one company has multiple opportunities in progress.
Grouping Data
Optimizing Visual Clarity: Grouping Data in Reports
Now, I want to organize the opportunities by company to get a clearer picture if one company has multiple ongoing opportunities.
To do this, simply choose the company name (Name) as the main group.
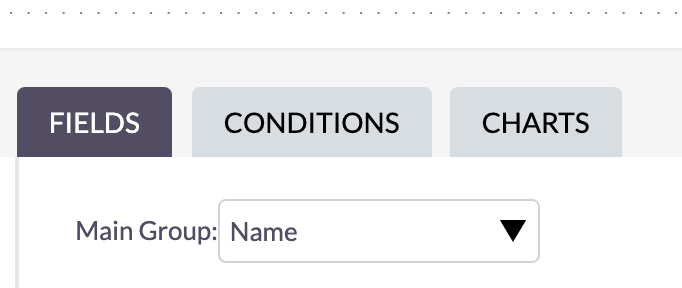
Hit save and take a peek at the results. The main group now neatly organizes various groups or sections, revealing various companies and their linked opportunities.
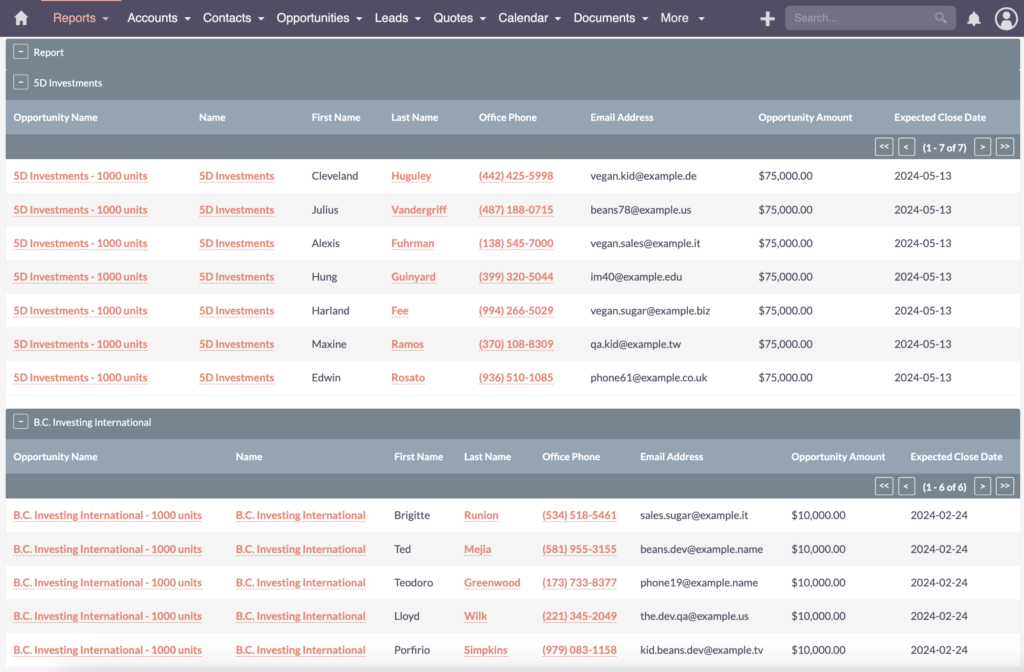
Now, take a look – there are two different opportunities within a company, and it’s evident that one opportunity has multiple people working on it, while the other has only one person assigned. This feature provides a clear overview of the company’s ongoing projects.
Let’s make the report even better by adding the stage of each opportunity. Filtering opportunities by stages can help prioritize efforts effectively. For example, if an opportunity is already closed, there is no need to allocate more resources to it.

Navigate to Opportunities in the module tree, then add the Sales Stage field. Placing it prominently next to the Amount will give us a much clearer view. Hit save, and let’s see the magic happen.
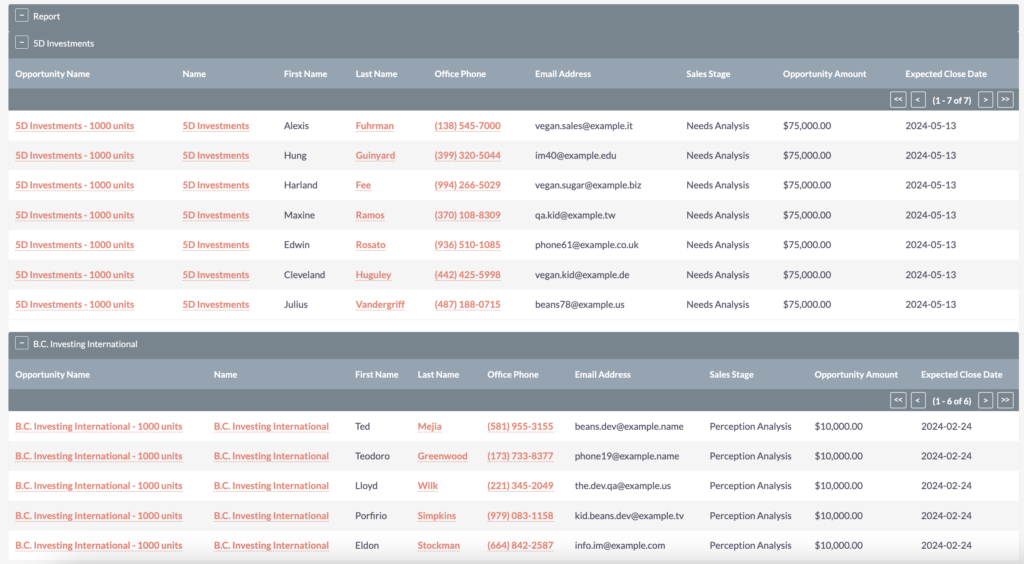
The opportunities are now grouped by stages such as perception analysis, value proposition, and more. However, I noticed opportunities categorized under “qualification” and “needs analysis” that might be better suited for sales preparation. To refine this, let’s edit the respective entry, and fine-tune the conditions for additional filtering.
More Filtering Techniques
More Filtering Techniques for Actionable Insights
So, you’ve got your sales stages set up and you’re ready to start filtering. But wait, why do we need to filter? Well, think about it – you don’t want to waste your time on prospects that are still in the early stages of the sales funnel.
With the power of conditions, you can filter out the opportunities that don’t meet your criteria. Just navigate to Conditions and add the Sales Stage.
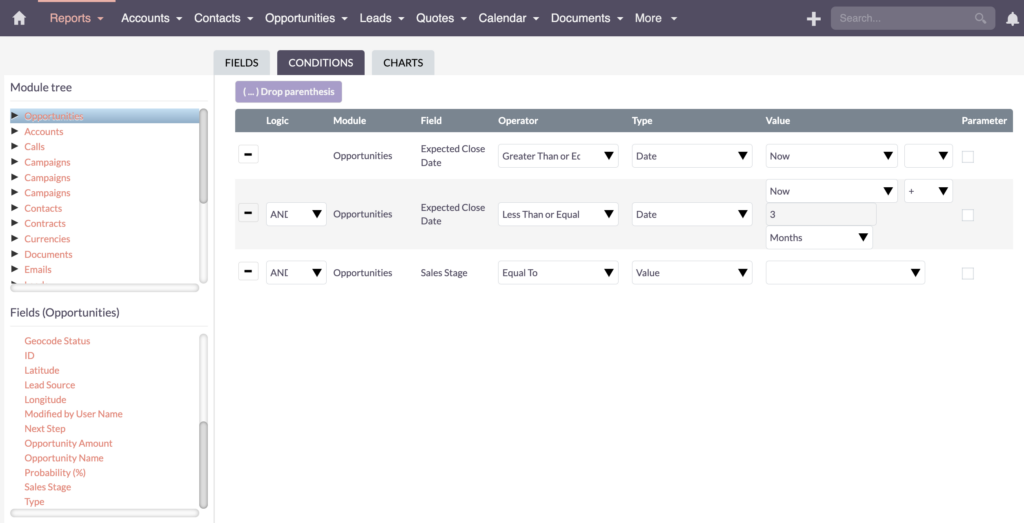
Now, select the specific stages you want to filter for. For example, let’s say you’re not interested in prospects that are still in the prospecting stage or opportunities that are already closed. You can filter those out and focus on stages like “perception analysis,” “proposal/price quote,” “negotiation/review,” and so on.
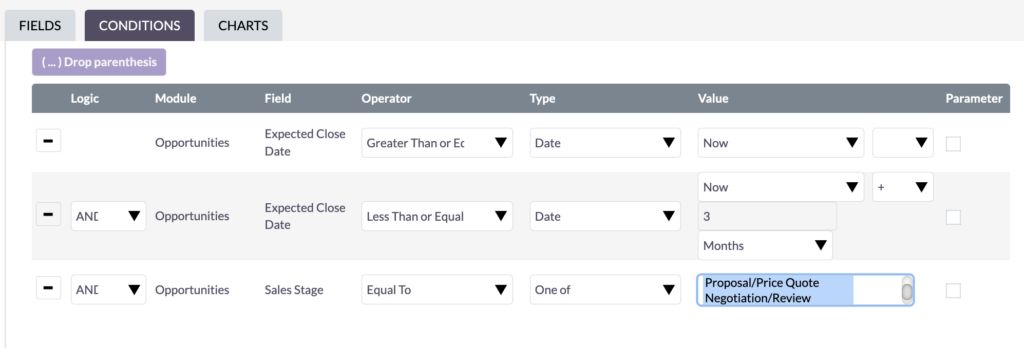
Navigating through this feature can be a bit tricky, but using the shift and arrow keys can help you achieve your desired outcome. You’ll see that it’s now narrowed and focused on opportunities that are nearing the closing stage.
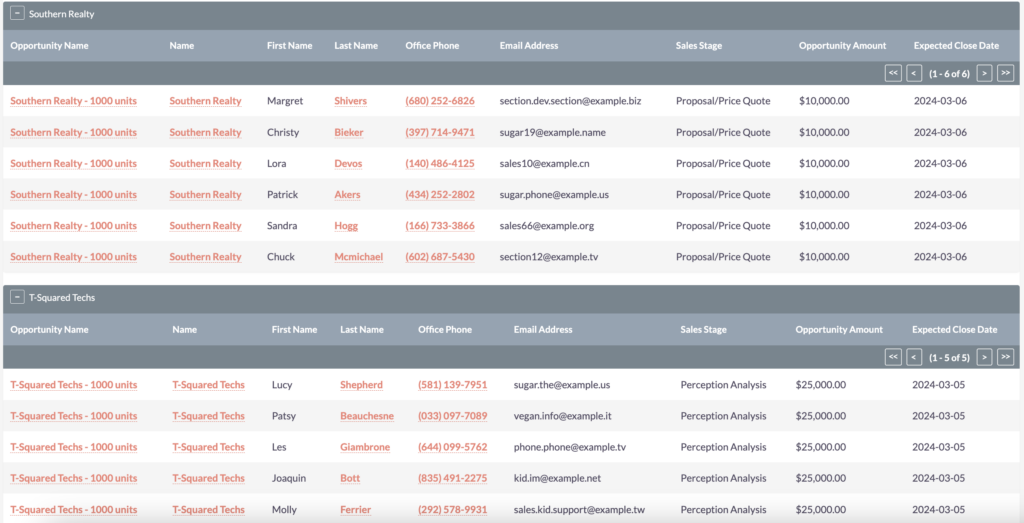
SuiteCRM’s filtering feature is your best friend when it comes to getting actionable insights from your sales process. By filtering out the opportunities that don’t meet your criteria, you can focus on the ones that really matter. And hey, who knows, maybe you’ll even close a few more deals!
Recap
SuiteCRM Reports – Deep Dive: A Quick Recap
Let’s wrap up and go over the key points from this blog post.
In this post, we took a deep dive into SuiteCRM reports and explored ways to connect different modules to display data from related modules. We also talked about effective grouping and filtering techniques, empowering you to focus your efforts and gain valuable insights tailored to a specific quarter.
By compiling all of this into a report, you open the door to insightful weekly meetings. This allows you to thoroughly discuss the crucial details highlighted in the report and make informed decisions.
Thanks for reading! We hope you found this helpful. Don’t hesitate to reach out if you have any questions or need further assistance. Have a great day!
